Avian First Aid: Removing a Broken Blood Feather
Broken Blood Feather – A Common Wound in Companion Birds
Whether a companion bird is flighted or clipped, a new flight feather presents a risk to the bird’s well being when broken and bleeding. After the new feather has completely emerged, the feather shaft or quill dries up and no longer presents a risk at all. Yet, if the growing feather, as indicated by length and by the shaft being full of blood, becomes accidentally damaged from either toys or an accidental fall, the shaft breaks. The bird can lose a great deal of blood in a short period of time. This is a true emergency and needs to be dealt with immediately! In most cases the broken blood feather can be handled easily by the avian caretaker. The most challenging aspect of dealing with such an emergency is using safe and proper towel restraint technique. As this is easier said than done, especially when presented with an emergency, please refer to towel restraint for HARI suggestions on safe and non-invasive towel restraint.
The most challenging situation arises when the bird is overweight or suffers from respiratory conditions. We recommend that these challenged birds be sprayed down to cool the body temperature. It is imperative to follow the below listed guidelines when dealing with any broken blood feather!
You’ll need the following supplies plus another person to assist, especially for large birds.
- Tweezers or proper sized hemostats or forceps depending on the size of the bird.
- Towels
- Velcro
- Quick stop, clay paste, school glue or other coagulant
- Spray bottle (to cool down overweight bird and to view the questionable feather)
- Water source for hydrotherapy
- After restraining the bird safely, use hydrotherapy technique to get a clear view of suspect feather.
- Determine how damaged the feather is. If the blood feather has matured to more than half the feather being emerged from the shaft, then it can be saved with white paper glue ,corn starch, or clay paste therapy. If the broken blood feather is bleeding significantly, it should be removed.
- The trick here is to remove the feather in one swift movement as failure to do this properly will result in complications and profuse bleeding. To avoid this, get a good grip on the shaft of the feather by placing the forceps perpendicular to the growth of the feather. Only grip the shaft, and not the flesh. Apply proper pressure on the skin for approximately10 seconds (where the feather shaft emerges), pull the feather shaft in one swift movement. You should have the feather, complete with inferior umbilicus intact, in the forceps. If the feather follicle site continues to bleed after applying pressure once the feather is removed, consider a coagulant to stop the bleeding and seek veterinarian help. This is a situation that may require stronger methods of blood loss control performed by a qualified avian veterinarian.
- Check the rest of the bird’s feathers for potential hazards. In flight feathers, especially, the other wing could have a “mirror image” at about the same stage of growth as the feather that was just pulled. In clipped birds, it is recommended to leave adjoining flight feathers in full flight condition to cushion the new growing and emerging feather.
- Consider re-evaluating the feathers in about a week. Check for any further new blood feather developments.
Primary feathers located on the birds’ wing are usually the culprit in terms of broken blood feather emergencies.

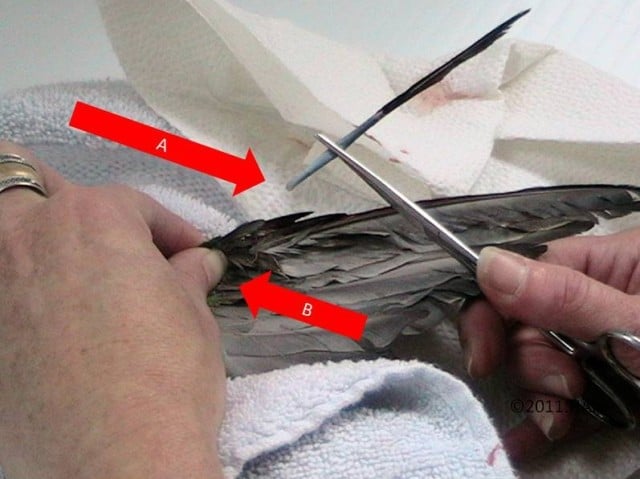
After determining that the bleeding feather needs to be removed, you must ensure a proper grip with hemostat forceps. Apply pressure to the skin at the base of the feather to be removed. Failure to do so could cause pain and rip the skin surrounding the blood feather. This can cause further complications and profuse bleeding. It is recommended to place the forceps perpendicular to the direction of the feather when gripping the feather and pull swiftly. Placement of the forceps in a vertical alignment with the feather, then pulling, can cause the feather to tear.

The pulled feather must be intact, complete with the rounded base or the inferior umbilicus (A). A broken feather shaft left inside the bird can result in a feather cyst or infection. Once the feather has been removed, apply pressure at the feather follicle site (B) for about 10 seconds to ensure the bleeding has stopped. After successfully removing the blood feather, clean the site, return the bird to a clean cage and monitor him closely.